Starting: 1st of Every Month
  +91 8409492687 |
  Contact@DevOpsSchool.com
Limited Time Offer!
For Less Than the Cost of a Starbucks Coffee, Access All DevOpsSchool Videos on YouTube Unlimitedly.
Master DevOps, SRE, DevSecOps Skills!
The chown (Change Owner) command in Linux is used to change the owner and group ownership of files and directories. It is particularly useful when managing permissions for multiple users on a system.
Every file in Linux has an owner and a group, as seen in the ls -l output:
-rw-r--r-- 1 user1 group1 1234 Jan 30 12:00 file.txt
- user1 → Owner
- group1 → Group
Now, let’s explore 10 powerful chown commands with practical explanations.
1. Change the Owner of a File
chown newuser file.txt
 What it does:
- Changes the owner of
file.txttonewuser. - The group remains unchanged.
 Example Before (
ls -l file.txt):
-rw-r--r-- 1 olduser group1 1234 Jan 30 12:00 file.txt
Example After:
-rw-r--r-- 1 newuser group1 1234 Jan 30 12:00 file.txt
 Useful when transferring file ownership to another user.
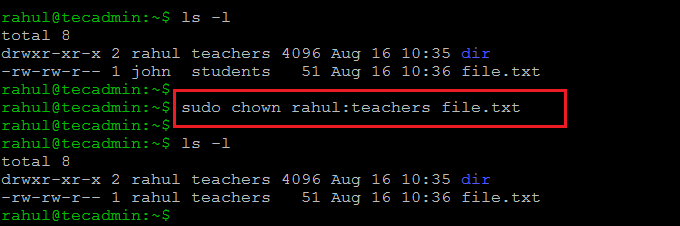
2. Change the Owner and Group of a File
chown newuser:newgroup file.txt
What it does:
- Changes owner to
newuserand group tonewgroup.
Before:
-rw-r--r-- 1 olduser oldgroup file.txt
After:
-rw-r--r-- 1 newuser newgroup file.txt
Ensures both owner and group are modified in one command.
3. Change Only the Group of a File
chown :newgroup file.txt
What it does:
- The owner remains unchanged, but the group is changed.
Before:
-rw-r--r-- 1 user1 oldgroup file.txt
After:
-rw-r--r-- 1 user1 newgroup file.txt
Equivalent to the chgrp command.
4. Change Owner and Group for Multiple Files
chown newuser:newgroup file1.txt file2.txt
What it does:
- Modifies both file1.txt and file2.txt.
Before:
-rw-r--r-- 1 user1 group1 file1.txt
-rw-r--r-- 1 user1 group1 file2.txt
After:
-rw-r--r-- 1 newuser newgroup file1.txt
-rw-r--r-- 1 newuser newgroup file2.txt
Saves time when modifying multiple files at once.
5. Change Owner for a Directory and Its Contents
chown -R newuser:newgroup mydir/
What it does:
-R→ Applies changes recursively to all files and subdirectories inmydir/.
Before:
drwxr-xr-x 1 user1 group1 mydir/
-rw-r--r-- 1 user1 group1 file1.txt
-rw-r--r-- 1 user1 group1 file2.txt
After:
drwxr-xr-x 1 newuser newgroup mydir/
-rw-r--r-- 1 newuser newgroup file1.txt
-rw-r--r-- 1 newuser newgroup file2.txt
Useful when transferring ownership of a project directory.
6. Change Ownership Based on Another File’s Ownership
chown --reference=referencefile targetfile
What it does:
- Sets
targetfileownership to matchreferencefile.
Example:
chown --reference=existing.txt newfile.txt
newfile.txtgets the same owner and group asexisting.txt.
Quick way to match file ownership settings!
7. Change Ownership Using User ID (UID) and Group ID (GID)
chown 1001:1002 file.txt
What it does:
1001→ User ID (UID)1002→ Group ID (GID)
Before:
-rw-r--r-- 1 user1 group1 file.txt
After (ls -n file.txt to check UIDs/GIDs):
-rw-r--r-- 1 1001 1002 file.txt
Helpful in scripts where UID/GID is known but not the username/group name.
8. Change Ownership for Files Owned by a Specific User
chown newuser:newgroup $(find /path -user olduser)
What it does:
- Finds all files owned by
olduserand transfers them tonewuser:newgroup.
Example: Change all files owned by john under /home/projects:
chown newuser:newgroup $(find /home/projects -user john)
Useful when deleting a user and reassigning files.
9. Prevent Symbolic Link Issues with -h
chown -h newuser:newgroup symlink
What it does:
- Changes the owner of a symbolic link, not the target file.
Without -h (ls -l symlink output):
lrwxrwxrwx 1 olduser oldgroup symlink -> targetfile
After using -h:
lrwxrwxrwx 1 newuser newgroup symlink -> targetfile
Useful when dealing with symbolic links in /etc or /usr/local/bin/.
10. Restrict Ownership Transfer to Superuser Only
chown root file.txt
What it does:
- Transfers file ownership to root.
- Can only be executed by a superuser (root).
Before:
-rw-r--r-- 1 user1 group1 file.txt
After (ls -l output):
-rw-r--r-- 1 root group1 file.txt
Important for securing critical system files.
Final Thoughts
chownis essential for managing file ownership and permissions.- Always use
-Rcarefully, especially on/etc/,/home/, or/var/directories. - Changing ownership to
rootcan restrict user access.