Limited Time Offer!
For Less Than the Cost of a Starbucks Coffee, Access All DevOpsSchool Videos on YouTube Unlimitedly.
Master DevOps, SRE, DevSecOps Skills!

Installing PHP on Windows 11 is a straightforward process that involves downloading, configuring, and setting up the PHP runtime environment. Here’s a detailed guide to help you get started.
Step 1: Download PHP
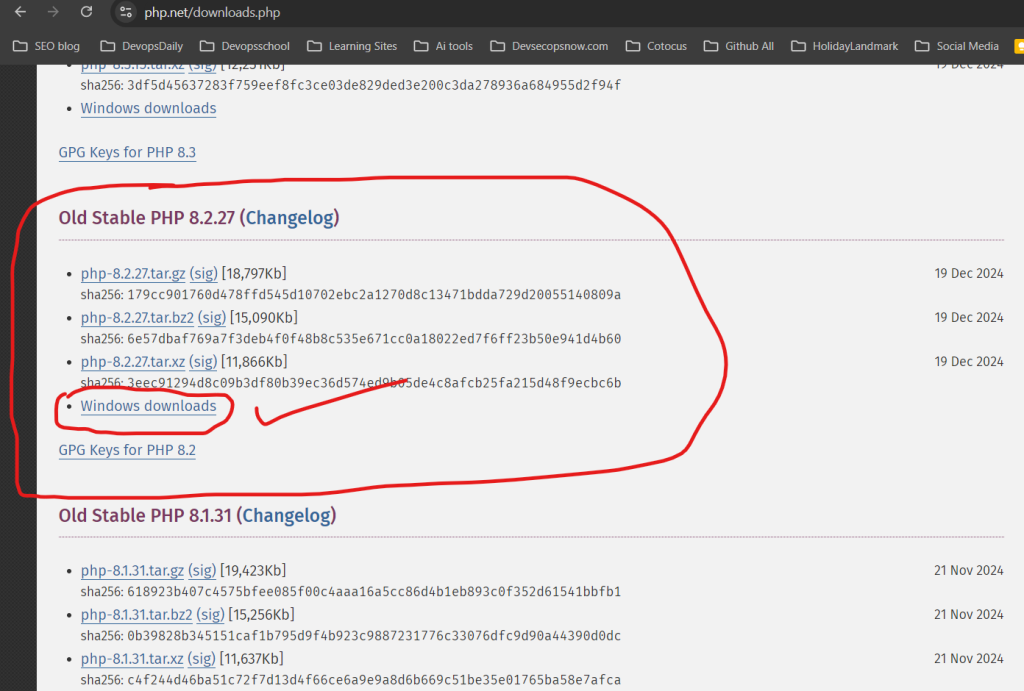
- Visit the PHP Website:
- Go to the official PHP website.
- Choose the Right Version:
- Download the Non Thread Safe (NTS) or Thread Safe (TS) version, depending on your server configuration. For development purposes, it’s common to choose the Thread Safe version.
- Ensure you select the Windows x64 build for compatibility with Windows 11.
Step 2: Extract the PHP Files
- Locate the Download:
- Navigate to the directory where the PHP
.zipfile is saved.
- Navigate to the directory where the PHP
- Extract the Files:
- Right-click the
.zipfile and select Extract All… or use tools like WinRAR or 7-Zip to extract it. - Extract the contents to a folder (e.g.,
C:\php).
- Right-click the
Step 3: Add PHP to the System Path

- Open Environment Variables:
- Right-click on This PC or My Computer and select Properties.
- Click on Advanced System Settings → Environment Variables.
- Modify the Path Variable:
- Under System Variables, locate the variable named
Pathand click Edit. - Add the path to your PHP folder (e.g.,
C:\php) and click OK to save.
- Under System Variables, locate the variable named
Step 4: Configure PHP.ini
- Locate PHP.ini:
- In the PHP folder, you will find two files:
php.ini-developmentandphp.ini-production.
- In the PHP folder, you will find two files:
- Choose and Rename:
- Rename
php.ini-developmenttophp.inifor development purposes.
- Rename
- Edit PHP.ini:
- Open the
php.inifile in a text editor (e.g., Notepad or VS Code). - Enable required extensions by uncommenting lines (remove the
;at the beginning). For example:extension=curl extension=mbstring extension=mysqli - Set the
timezoneto your region:date.timezone = Asia/Kolkata
- Open the
Step 5: Verify the Installation

- Open Command Prompt:
- Press
Win + R, typecmd, and hit Enter.
- Press
- Check PHP Version:
- Type the following command:
php -v - If PHP is installed correctly, the version details will appear.
- Type the following command:
Step 6: Optional – Integrate with a Web Server
PHP can run standalone, but integrating it with a web server like Apache or Nginx is common for development.
For Apache:
- Download and install XAMPP or configure Apache manually.
- Update the
httpd.conffile in the Apacheconfdirectory to include PHP:LoadModule php_module "C:/php/php8apache2_4.dll" AddHandler application/x-httpd-php .php PHPIniDir "C:/php" - Restart Apache.
For Nginx:
- Install Nginx and configure it to point to PHP by adding the following in
nginx.conf:location ~ \.php$ { include snippets/fastcgi-php.conf; fastcgi_pass 127.0.0.1:9000; fastcgi_param SCRIPT_FILENAME $document_root$fastcgi_script_name; include fastcgi_params; } - Restart Nginx.
Step 7: Test PHP
- Create a Test File:
- Create a new file named
info.phpin your web server’s root directory (e.g.,htdocsfor XAMPP). - Add the following code:
<?php phpinfo(); ?>
- Create a new file named
- Run in Browser:
- Open a web browser and navigate to
http://localhost/info.php. - If PHP is installed correctly, you will see the PHP info page.
- Open a web browser and navigate to
Conclusion
Congratulations! You have successfully installed PHP on Windows 11. This setup allows you to run PHP scripts locally and start building dynamic web applications. For a seamless development experience, consider using IDEs like VS Code, PhpStorm, or Sublime Text. Happy coding! 🚀

