
Limited Time Offer!
For Less Than the Cost of a Starbucks Coffee, Access All DevOpsSchool Videos on YouTube Unlimitedly.
Master DevOps, SRE, DevSecOps Skills!
Enabling Google Login in a Laravel project is a great way to simplify the authentication process for users. Here’s a step-by-step, humanized guide to integrate Google Login in your Laravel application.
Step 1: Install Laravel Socialite
Laravel Socialite provides an elegant and simple interface for OAuth authentication, including Google login.
- Run the following command in your terminal to install Socialite:
composer require laravel/socialite - Open the
config/app.phpfile and ensure theSocialiteservice provider is added (for Laravel 5.x, this is required):'providers' => [ Laravel\Socialite\SocialiteServiceProvider::class, ], 'aliases' => [ 'Socialite' => Laravel\Socialite\Facades\Socialite::class, ],
Step 2: Set Up Google API Credentials
You need to create Google API credentials to connect your Laravel app with Google’s OAuth services.
- Visit the Google Cloud Console.
- Create a new project or select an existing one.
- Navigate to APIs & Services > Credentials and click Create Credentials > OAuth Client ID.
- Configure the consent screen:
- Provide an App Name and email.
- Add scopes (e.g.,
email,profile).
- Create the credentials:
- Select Web Application.
- Add your authorized redirect URL (e.g.,
http://your-domain.com/auth/google/callback).
- Copy the Client ID and Client Secret.
Step 3: Configure Your Laravel Environment
Add the Google API credentials to your .env file:
GOOGLE_CLIENT_ID=your-google-client-id
GOOGLE_CLIENT_SECRET=your-google-client-secret
GOOGLE_REDIRECT_URL=http://your-domain.com/auth/google/callback
Step 4: Configure Laravel Socialite
Update the config/services.php file to include Google as a provider:
'google' => [
    'client_id' => env('GOOGLE_CLIENT_ID'),
    'client_secret' => env('GOOGLE_CLIENT_SECRET'),
    'redirect' => env('GOOGLE_REDIRECT_URL'),
],
Step 5: Create Routes
Define routes for redirecting to Google and handling the callback:
use Laravel\Socialite\Facades\Socialite;
use App\Http\Controllers\GoogleController;

Route::get('auth/google', [GoogleController::class, 'redirectToGoogle'])->name('google.login');
Route::get('auth/google/callback', [GoogleController::class, 'handleGoogleCallback'])->name('google.callback');
Step 6: Create the Controller
Generate a controller to handle the logic:
php artisan make:controller GoogleController
In the GoogleController, add the following methods:
namespace App\Http\Controllers;

use Illuminate\Http\Request;
use Laravel\Socialite\Facades\Socialite;
use App\Models\User;
use Auth;

class GoogleController extends Controller
{
    public function redirectToGoogle()
    {
        return Socialite::driver('google')->redirect();
    }

    public function handleGoogleCallback()
    {
        try {
            $user = Socialite::driver('google')->stateless()->user();

            $findUser = User::where('email', $user->getEmail())->first();

            if ($findUser) {
                Auth::login($findUser);
                return redirect()->intended('dashboard');
            } else {
                $newUser = User::create([
                    'name' => $user->getName(),
                    'email' => $user->getEmail(),
                    'google_id' => $user->getId(),
                    'password' => encrypt('password') // You can use a better approach
                ]);

                Auth::login($newUser);
                return redirect()->intended('dashboard');
            }
        } catch (\Exception $e) {
            return redirect('/')->with('error', 'Something went wrong!');
        }
    }
}
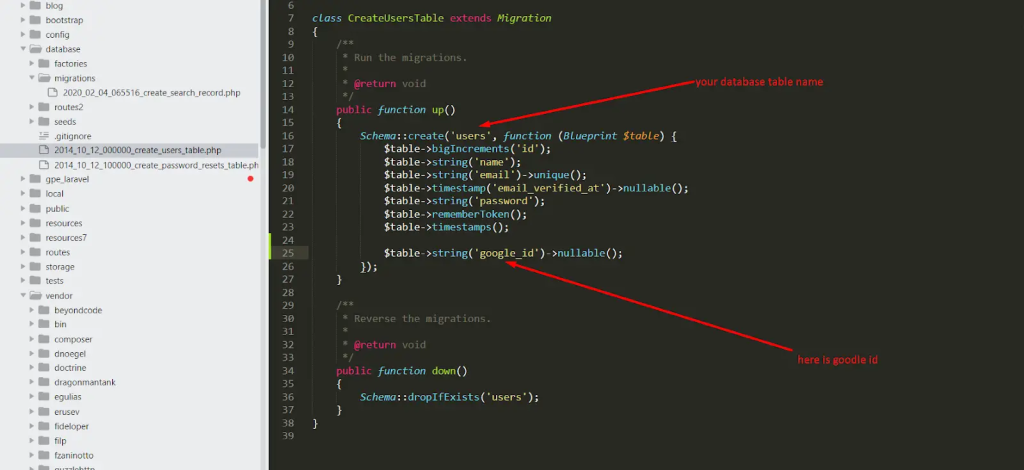
Step 7: Update User Model
Make sure your User model has a google_id field. If it doesn’t, create a migration to add it:
php artisan make:migration add_google_id_to_users_table --table=users
In the migration file:
public function up()
{
    Schema::table('users', function (Blueprint $table) {
        $table->string('google_id')->nullable();
    });
}
Run the migration:
php artisan migrate
Step 8: Add a Login Button
Add a Google Login button to your frontend, e.g., in resources/views/auth/login.blade.php:
<a href="{{ route('google.login') }}" class="btn btn-danger">Login with Google</a>
Step 9: Test Your Integration
- Start your server:
php artisan serve - Visit the login page and click “Login with Google”.
- After successful login, you should be redirected to your dashboard or intended URL.
Why Use Google Login?
- Simplified Registration: No need for users to remember another password.
- Increased Security: Users rely on Google’s authentication, reducing the risk of security issues.
- Enhanced UX: Users can log in quickly and easily.
This humanized guide ensures a smooth and comprehensive Google Login setup for your Laravel project. Let me know if you need further assistance or adjustments!